I mentioned in my previous post on my third pregnancy at month 6 post that I had a bit high glucose reading (8.5mol when normal range should be 6-7mol) and after texting my gynae, he adviced me to do a self-blood sugar test and to report back the results to him before he determines the next step of actions for me. Hence, this post is to share with you how to do self-monitoring of blood glucose.
Firstly, you will need to get the following items from your local pharmacy:
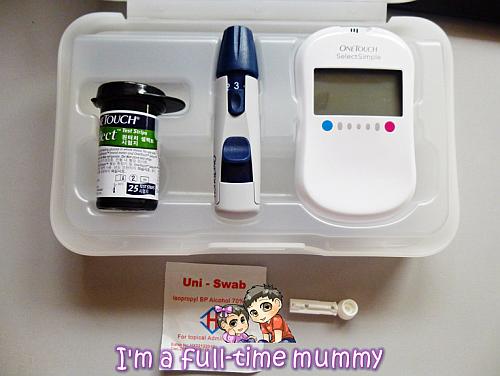
- Sterile lancets (needle to prick your finger to extract small amount of blood for the testing)
- Alcohol swabs
- Glucometer
- Test strips (where you drip your blood onto the strip to get reading from the glucometer)

Picture below showing you all the items required to perform your self-monitoring of blood glucose:
Now here's the steps to perform your self-monitoring of blood glucose:
Step 1: Get ready to insert the test strip into the glucometer. Glucometer will automatically turned on when test strip inserted completely. At this moment, I did not slide in the test strip completely as I take some time to gather courage to prick my finger do the blood test.
Step 2: Ensure test strip is adjusted into the glucometer properly so that you can straight away push it in when you are ready to smear your blood onto the test strip.
Step 3: Open up the cover of the lancing device. Insert a sterile lancet into the lancing device. Just twist clockwise/anticlockwise to separate out the needle from the protective head of the lancet.
Step 4: You can adjust your level of how deep you want your finger to be prick. Mine is 6 as anything below doesn't even poke through my skin. Do note that the higher the number, the deeper the needle will poke into your skin. Close back the cover of the lancing device.

Step 5: Get ready an alcohol swab and rub the finger you want to prick. Let the alcohol on your finger dry first as it may affect the glucose values shown by the meter. Adjust the lancing device on top of the finger to prick and press the trigger for the needle to prick your finger.
Step 6: Push in the test strip, wait for the sign on the glucometer to indicate it is ready to read your blood test. Draw enough blood so that you can smear some onto the test strip. Wait for 5 seconds for your results to be shown on the glucometer screen. Do remember to use back the alcohol swab to stop the bleeding. You're done!

Some tips I got from the Internet:
- Don’t prick the same finger in the same area- keep on changing the places for pricks- this prevents the pain or infection which may happen if the same finger is needled all the time.
- If you use alcohol swabs to wipe the skin before pricks let it dry completely as alcohol itself is a reducing agent and may affect the values shown by the strip.
- When the oozing droplet is not sufficient increase the number on the dial of the lancing pen – or if you are pricking the finger manually, prick deeper - alternately change the place of pricks.
- Do not recycle the lancets, alcohol swabs or test strip. Use once and discard after use!
So there you go, hope I didn't miss out any information and thank you for reading!
