DIY Chinese New Year Fish Craft

~ Posted on Wednesday, January 26, 2011 at 2:25 PM ~

In case you missed out, I have previously shared 2 tutorials on making your own DIY Chinese New Year Lantern (style 1 and style 2) as CNY is coming in a weeks time! So, here goes my tutorial on how to make your own fish craft:

What you need is: Red packets (or what we Chinese called 'Ang Pows')-quantity up to you, ensure it is square shape, stapler, scissors.

DIY Chinese New Year Fish Craft
Take 1 red packet which is exact square shape,
ensure the front is facing you, fold in half diagonally.
DIY Chinese New Year Fish Craft
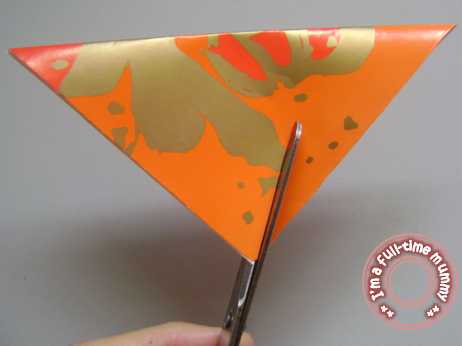
Ensure the horizontal line is at the top. At the bottom
corner, cut about 1 inch, 45 degrees upwards.
DIY Chinese New Year Fish Craft
When you reached about 1 inch length, cut towards the
end of one of the horizontal edge.
DIY Chinese New Year Fish Craft
You will get something like the above.
Open up the folded red packet.
DIY Chinese New Year Fish Craft
With the folded line facing you vertically, cut the 'tail'
of the fish about 1.5 inch long.
DIY Chinese New Year Fish Craft
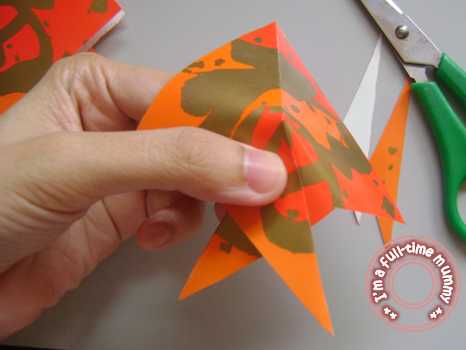
Take one side of the 'tail' and fold over to the other
side. Staple them together (where my thumb is)

The results? TADAAAAAAA!!!

If you're feeling more adventurous, you can string up the fishes with a string and hang it as a fish lantern. Or string each up and hang it on your Chinese orange tree. Else, you can just tape it to the wall like what I did. What I did was I just stick a double sided tape at the tail of the fish and they'll be good for wall or door decorations.

Hope you enjoy my simple tutorial!

DIY Chinese New Year Lantern Style #2

~ Posted on Wednesday, January 19, 2011 at 9:31 AM ~

I had previously posted a tutorial on making Chinese New Year (aka CNY) lantern as CNY is coming in a few weeks time! So, here goes my  second DIY Chinese New Year Lantern:

What you need is: 9 pieces of red packets (or what we Chinese called 'Ang Pows'), stapler, scissors, cellophane tape and a piece of string.

DIY Chinese New Year Lantern
Take 1 red packet, ensure the front is facing you,
fold in the 2 top corners until they meet.
Repeat with the bottom & for the other 7.
DIY Chinese New Year Lantern
Take 4 of the red packets, arrange them
with the folded edges & staple the corners together.
Repeat with the other 4 red packets.
DIY Chinese New Year Lantern
WIth both the top & bottom of the lantern, 
line up the folded edges & staple them together.
DIY Chinese New Year Lantern
Don't worry if your lantern looks weird,
they will eventually close up together.
DIY Chinese New Year Lantern
I actually use the cellophane tape to close
the gaps in between the edges of the red packets.
DIY Chinese New Year Lantern
A close up shot of how you should
stapled the folded edges...
DIY Chinese New Year Lantern
I added an extra touch to the lantern. Take the 9th red
packet & cut vertically leaving some space at the top.
DIY Chinese New Year Lantern
Roll up the red packet & tape it with a string which will be
used to hang the lantern as well.

The results? TADAAAAAAA!!!

DIY Chinese New Year Lantern DIY Chinese New Year Lantern

Hope you enjoy my simple tutorial!

DIY Chinese New Year Lantern Style #1

~ Posted on Monday, January 17, 2011 at 9:18 AM ~

Chinese New Year (aka CNY) is coming in a few weeks time! Few days earlier, I was inspired with this photo I saw on my cousin in-law's house. She homemade this very pretty lantern and hung it in her house and I was like 'oh man... I want one of those too!' But reality check... I don't think I could try that out so fast (cos it requires 30 pieces of red packets to do it) and I really don't want to waste that many red packets in my 1st attempt, so I Googled around and found some ideas to experiment.

Here goes my DIY Chinese New Year Lantern Style #1:

What you need is: 8 pieces of red packets (or what we Chinese called 'Ang Pows'), stapler, scissors, cellophane tape and a piece of string.

Take 1 red packet, ensure the front is facing you,
fold in the 2 top corners until they meet.
Repeat with the bottom & for the other 7.
Take 4 of the red packets, arrange them
with the folded edges & staple the corners together.
Repeat with the other 4 red packets.
WIth both the top & bottom of the lantern, 
line up the folded edges & staple them together.
Don't worry if your lantern looks weird,
they will eventually close up together.
I actually use the cellophane tape to close
the gaps in between the edges of the red packets.
If you want, you can put in a string through the
hole so that you can hang the lantern!

The results? TADAAAAAAA!!!

Stay tuned as I will post another style of making this lantern soon! Hope you enjoy my simple tutorial!